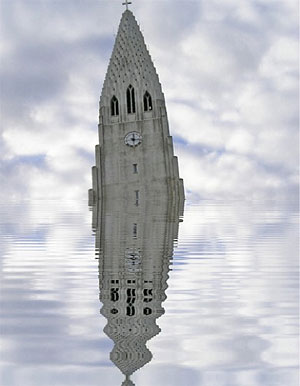
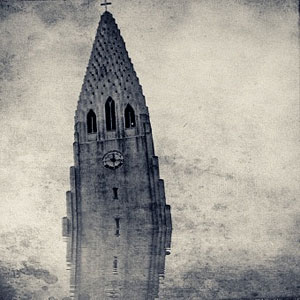
The film industry, and Hollywood in particular, have filled our imagination for years using post-apocalyptic visions of submerged cities in ruins and all that jazz. To achieve the effect in a sumptuous Hollywood-style would take too much money, I am afraid. Anyhow, with little effort and simple means, you too can recreate on the iPhone your own little post-doomsday scenery.
This effect works great on bold architectural details, like the top of bell towers, skyscrapers or other buildings, but it can be applied successfully to a number of other objects, so feel free to experiment.
Apps I used: WaterMyPhoto, Cameramatic, Infinicam.
- I choose an average photo of the Hallgrímskirkja, a local church with an impressive and unique bell tower. The photo is slightly tilted. I load the photo into WaterMyPhoto (->Photo Album). For quickness’ sake I choose this app, mainly because it’s so simple to use and you don’t have to make other adjustments apart from selecting the area of the image you want reflected. Unfortunately, the app only saves at very small resolution (a less than satisfactory 390×502 pixels). The app is free, but it displays ads. If you care to remove them, you can purchase the in-app remove ads feature for $0.99. I adjust the photo, making sure I am keeping the cross on top of the tower into the frame (I like that detail) and tap on the Crop button to confirm. After the app generates the water reflection, all I have to do is saving (->Done Editing->Save Photo).

Choosing the photo.

Applying the water reflection effect.
- I open the image in Cameramatic. I adjust the image to the square cropping tool and from the Light Box, I tap on the monkey wrench button to access the edit area. From filters, I select a monochrome filter. In this case I picked Retrochrome (Filter->B&W->Retrochrome), but anything balanced, not too contrasted or faded, would have worked. Then I apply a frame (Frame->Texture->Grunge Paper 03). I save to Light Box and then to Camera Roll by tapping on the “+” sign.

Turning into monochrome and adding texture.
- I open the photo in Infinicam because I know it has some lovely hazy effect. Autochrome, which is one of the presets that come with the app, is my personal choice. Since I like the hazy look, which makes the texture and reflection look subtler, but I don’t think the reddish hue fits the mood I am trying to convey, I apply another filter: this time it’s one of my own presets (whose code is DJX-63A0), which turns the image into a more appropriate sepia. All I have left to do is saving.

Applying haze with Autochrome.

Turning the photo into sepia.
This is what I did in this very specific case. There are many other ways to achieve the same overall result. For example, you could choose other tools to apply your favorite textures and borders, to fix exposure or to tilt your subject further, for a more dramatic effect. You could go either for an uncropped image or for a different format than square, which I used here. It all depends on what makes you more comfortable or what pleases your eye.


Amazing tutorial, I’m trying to do what you say and maybe I’ll post tomorrow the result on my 365 project blog. It’s the first time I’m using Infinicam, I’d like to know: is there a way to insert your filter code in my app? Thanks and congratulation for your great blog.
Thanks for reading! And to answer your question: yes, you can manually enter the code in Infinicam. You can input the code by tapping and holding the “Press for new camera” button.
BTW, I visited your 365 blog more than once, and I really enjoyed looking at your photos =)
Thank you for the tutorial.
One question, when you create your own presets in Infinicam, do you do this by chance, or do you know what each number/letter stands for? (I only know that the last digit stands for frame style). It is difficult for me to control the app, so I avoid it.
You can only generate random effects and add/change a custom border. Of course, you can also write your code from scratch, but personally I’ve never tried it, because my memory sucks and I can never remember what letters and numbers stand for =) Anyway, that is probably the main reason Infinicam was not as successful as other similar apps. Basically, you can build a consistent library of filters only by saving them when they are randomly generated or by sharing them with others. Too much of a bother for many users, I assume.
Great tutorial! I’ve just downloaded Cameramatic and Infinicam after reading it. Love your final picture.
Resolution of final picture will be much better now, too. Back then adding the water reflection meant you could only save up to 380 pixels, while now final size for Water My Photo is over 1000 =)
Comments on this entry are closed.