I was preparing another image for one of my series and for this purpose I was taking several pictures to choose from among those the ones I would need for it. However, as it often happens, at some point I took another path and I created something different from what I was planning. I like minimal images, but I honestly have little ability for them. The partner in crime says mine is horror vacui, and probably he is right. Anyway, this wasn’t conceived as a minimal picture, but it became one.
Apps needed:
ProCamera
Leonardo
iColorama S
Plastic Bullet
Modern Grunge
Handy Photo
Infinicam
- Step 1 – Shooting
I started by taking a few pictures of myself in silhouette. Among those, I selected three photos in all, one for head and bust, two for hands and forearms. I used a tripod with Joby’s GripTight attached to hold the iPhone and the app ProCamera with timer set to 20 seconds for shooting. Having an app that allows a certain degree of exposure and focus control is very important for silhouettes. In ProCamera, I adjusted exposure and focus and then locked them to make sure nothing would mess up as soon as I moved in front of the camera. Framing and overall quality of these pictures are horrible, I really look like a fat duck and the background is very distracting, but this didn’t concern me, as I used these shots only as a sort of blueprint.

01 - Taking the pictures - Step 2 – Assembling shots
I launched Leonardo and created a new document, with an empty white layer for background. I loaded the bust image into the app as a separate layer and started masking away everything but the silhouette. After this, I loaded the hands as two separate layers and masked what I didn’t need, exactly as I did with the bust. With the transform tools, I moved, rotated and resized the hands to match the bust image. I used the brush from the tools panel setting its color to black and brushed on all three layers to make the silhouette’s darkness even and total.

02 - Assembling Shots - Step 3 – Adding the artistic pen effect
In iColorama S for iPhone, I opened the composite silhouette and went to the Artist effects in the Style panel. I chose the pen brush and adjusted size and intensity of the effect. I temporarily decreased the opacity to use the original layer as a guide. Getting the desired balance between strokes took a while. I increased opacity again and applied the effect. I then picked the first preset from the Explode effects to add a few minor splatters around the borders of the silhouette. I finally moved to the Adjust panel and applied a light blur effect to the whole image.

03 - Adding the artistic pen effect - Step 4 – Enhancing the extreme graphic look
I opened the file from iColorama in Plastic Bullet and started generating effects to choose from. Before being able to save, I had to press the refresh button quite a few times as I needed to find an effect that, even with the right degree of contrast, didn’t eat away too much pen stroke detail, in addition to being borderlesss and without intense vignette.

04 - Enhancing the extreme graphic look - Step 5 – Grunging it up
I brought the Plastic Bullet file into Modern Grunge. I used one of my custom presets, one simulating a rich and rough paper surface, but without much color and with grunge edge set to 0, and saved the result.

05 - Grunging it up - Step 6 – Adding more textures
In Handy Photo, I applied one of the water textures to a neutral grey layer with the same size of my silhouette image. I saved. In Leonardo, I opened the file I created in Modern Grunge and the water texture. I could have applied the texture directly on the silhouette image in Handy Photo, but I preferred to have more flexibility, choosing exactly how to blend the layers, masking the texture from areas where it would be visually redundant and fine tuning through accurate levels adjustments.

06 - Additional texturing

06 - Merging textures - Step 7 – Black and white conversion with a mood
In Infinicam, I loaded the latest file from Leonardo and chose one of the many black and white styles I generated and saved for further use (UV1- Z2A0). I was undecided at first and tried different styles. Finally I went for a simple classic looking monochrome, without leaks, vignette, grain and other glitches.
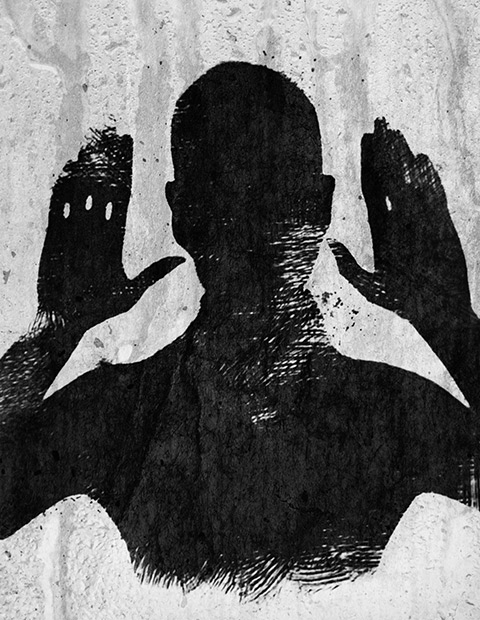
07 - Black and white conversion
I made significant changes to the original idea as soon as I knew that one of my short stories was finally going to be published in an anthology together with others. Ideally, the final artwork is an illustration for it. The story is something dealing with childhood, fantasy, and with the need for destruction that is a fundamental component to both.
Congrats on the upcoming publication.