iPhone Photography Tutorials #7 – How To Turn One or More Photos into Minimal Illustrations

I was preparing another image for one of my series and for this purpose I was taking several pictures to choose from among those the ones I would need for it. However, as it often happens, at some point I took another path and I created something different from what I was planning. I like minimal images, but I honestly have little ability for them. The partner in crime says mine is horror vacui, and probably he is right. Anyway, this wasn’t conceived as a minimal picture, but it became one.

Apps needed:
ProCamera
Leonardo
iColorama S
Plastic Bullet
Modern Grunge
Handy Photo
Infinicam Continue reading “iPhone Photography Tutorials #7 – How To Turn One or More Photos into Minimal Illustrations”

iPhone Photography Tutorials #5 – Creating Vintage Roses

This is a new installment in our iPhoto Tips series for beginners and intermediate photography apps users. The aim is to help iPhone shooters to enhance mobile pictures and create original artwork with them. The techniques shown are very easy to reproduce and can be adapted to a variety of styles with just a little creativity.

In this tutorial we’ll be using multiple layers’ blending to create a new image from a simple — and boring! — iPhone shot.

I am starting with this rose picture, taken with the iPhone 4s default Camera app:

Vintage rose iPhone tutorial pt. 1
The original photo

Continue reading “iPhone Photography Tutorials #5 – Creating Vintage Roses”

iPhone & iPad Layer Blending Modes Explained

Making use of layer blending can take your iPhone and iPad photography and your post-processing on a higher level, as it enormously widens creative possibilities. However, working with blending modes can be confusing at first and differences between one mode and the next can appear not completely evident.

As a matter of fact, no photo app comes with a truly informative guide to help the newbie in the task of getting started with layer blending. The best idea is to experiment how each mode affects your images, but it can be tough to get the hang of it. For this reason, I am writing a brief overview of the most used blending modes in iPhone photo apps. Most of them you can also find in photo editing programs as Photoshop, some others have slightly different names — but what you can achieve with them is exactly the same. Hopefully, this little guide will help you have a better understanding of what each of the commonest layer blending modes used in today’s photo applications can do.

First, let me explain a few crucial terms used in the layer blending modes descriptions: a Base Layer is the original image you start with; a Blend Layer is the layer placed above the base that needs to be blended with it. To make things easier to understand, I will be grouping modes according to the result they allow to achieve, rather than according to their strictly technical definitions.

iPhone layer blending sample images
These are two random iPhone sample images I am going to use in the guide.

Continue reading “iPhone & iPad Layer Blending Modes Explained”

iPhone Photography Tutorials #4 – Faded Retro Look Quickly in PhotoForge 2

A slightly washed out look with vibrant colors is very easy to create using one or more of the many apps which are provided to iPhone and iPad users. There are tons of presets around to obtain similar results, but in some instances, the best option you have to make sure effects will go well with your photos is creating your own, fine-tuning every setting to make sure the result will be as you like.

For this brief tutorial I am using PhotoForge 2 on the iPhone, as it has everything I need for my purpose. You can follow exactly the same steps on the iPad.

1. Open your photo of choice in PhotoForge 2. I am using a random photo I have taken a few days ago while testing the macro lens for iPhone.

Step 1 - Choosing the photo

2. Go to Adjustments by tapping on the three-slider icon and select Brightness/Contrast. Move the brightness slider control up to around +5; do the opposite with contrast and move it down to about -50. Depending on the overall brightness and contrast of the original photo, you may want to adjust these values for obtaining the right degree of fading on the image of your choice.

Step 2 - Setting brightness and contrast
Step 2 - Fading the photo

3. Now let’s produce some color shifting. Remaining in Adjustments, Select Curves. Set the curves in RGB mode for each of the three colors, Red, Green and Blue. Try to achieve something close to what is shown in the screenshots.

Step 2 - Adjusting Curves
Step 2 - Adjusting colors

4. For this style, we want a faded overall look, but at the same time we are looking for vivid colors. Always in Adjustments, select Vibrance. Move the slider up to +25.

Step 3 - Setting Vibrance
Step 3 - Toning up color

As a final touch, we are going to add some vignetting. In PhotoForge 2, you can add a vignette simply using the Vignette tool included in the app’s FX section. However, I prefer the vignette to blend a little more with the photo, so I am using Layers to achieve a slightly better result.

5. Go to Layers by tapping on the three-layer icon and create a new blank layer above the photo’s; select a white fill color for it. Change the layer’s blending mode to Multiply. Leave opacity to 1.

Step 5/1 - Creating a new white layer
Step 5/2 - Changing the blending mode to multiply
Step 5/2 - Changing the layer mode to multiply

6. Go to FX and select Vignette. Pick a vignette style that goes well with your photo. In my case, I choose Vignette 2 and I move the intensity control up to around 0.60. For a more “enclosed” feeling, you can raise intensity even more.

Step 6 - Adding vignette

And that’s it! You can save the photo to your photo album or share it with whomever you like. PhotoForge2 saves the complete history of your post-processing, so you can go back in any moment and if you do not like the final look of your image you can make further adjustments to contrast, curves, vibrance, and so on.
Step 7 - Final result


iPhone Photography Ttutorials #2 – Painterly Aged Photo Effect

Antique monochrome photos have an incredible charm. Most of them not only have a strangely surreal and almost ghostly feel, but also a beautiful painterly quality: for a long time, the influence of painting over photography was very strong and photographers often tried to imitate stylistic principles followed by painters.

With just a few easy steps, I intend on demonstrating how to achieve the evocative feel of aged photos on your iPhone. This is just one of the many processes you can follow.

Apps needed: iCamera HDR, Iris Photo Suite, Plastic Bullet. Optional: Bracket Mode.

1. Take two bracketed exposures of a landscape of your choice. Daylight photos featuring skies with significant detail (huge, fluffy clouds, etc.) will work better. You can either take your exposures directly within iCamera HDR or use Bracket Mode, whatever makes you feel more comfortable. If you already have photos you want to use, jump to step 2. If you have the HDR composite, go to step 3;

2. Merge the exposures in iCamera HDR, choosing Tone Balancer. Adjust the parameters to obtain rich, neatly contrasted details, without exaggerating with overblown brightness, and then save;

3. Open your saved HDR picture in Iris Photo Suite. Tap on the layers icon  -> One Touch -> Grunge. For this example, I picked Noise, but you can go for one of the other effects, if it suits your photo better. Leave the value to around 100 or little less, so the effect enhances the contrast of your image. Apply and save;

4. Load the image you just saved on Plastic Bullet. Our aim is to have our final image look like an old, aged picture; Plastic Bullet’s monochromes are particularly convincing for our purpose. Generate random styles by pressing on the refresh button until you obtain something that has the right balance of blur and brightness: we want the picture to look old and deteriorated but we want at the same time to preserve as much detail as it is possible. I decided to go for a dark silver tone with a thick border. When you find a style you like, save to your camera roll and you’re done!

And here is our final result:

iPhone Photography Tutorials #1 – Easy Dramatic Black and White In The Film Noir Style

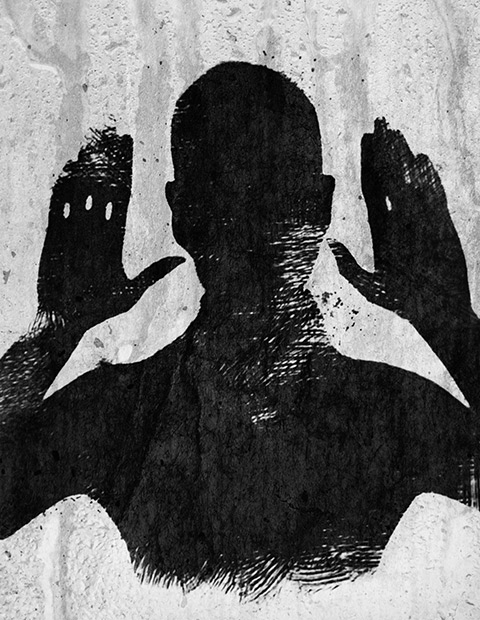
I’ve been asked how I achieve a dramatic black and white look on photos taken with the iPhone. I have more than a way to do it, but today I am sharing one among the processes I follow.

Sometimes you take a photo, especially of some architectural detail or building, and it looks all right at the moment of shooting; then you take a look at your photo moments later and you realize it’s sort of forgettable. The light isn’t as great as you remembered it and the final picture has too much noise; perhaps the colors aren’t stunning either. Something tells you though that you still have some use for that shot, a detail perhaps, the shadow casting, a suggestive angle, and so on. How to improve this kind of photos, adding to them a dramatic twist in the style of old school film noir?

Apps needed: Film Lab, DXP.

1. Choose your average building photo, the one that didn’t turn out as you would have liked but that for some reason you still think has some potential. The photo can be taken simply with iPhone’s native camera, but you can use also shots taken with HDR apps or fake HDR apps, like Dynamic Light;

2. Open Film Lab. Choose Film Simulation -> Vintage -> Daguerreotype – High Contrast -> OK. This filter not only will turn the photo in a black and white with character, but will also enhance contrasts, bringing out the grain of iPhone shots taken in so-so lighting conditions. Adding the grain digitally usually doesn’t look very natural, so I always try to avoid it;

3. Still in Film Lab, go to Tool Box -> Brightness/Contrast. Increase contrast even more, so that dark areas look almost pitch black but light areas are still quite evident. Press OK and save when you are done;

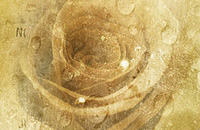
4. Browse the Internet for some vintage looking black — or at any rate very dark — frame on white background, something that will give a flair to your photo without making it look extremely dirty or scratched. There are many textures you can use for free and/or in the Creative Commons on sites like Deviantart or Flickr — but there are many others besides these two. When you find something that suits your taste, save it. It doesn’t have to be a black and white frame, you can desaturate later;

5. Open DXP -> Load from Album. Choose your edited black and white image. Load From Album again and choose your frame. Make sure that in the Settings “fit to first image size” is selected, otherwise DXP will crop the image in the case the second picture is of a different size than the first. Tap on DXP Effect -> Multiply. Move the slider knob to 100%, towards the end of the slider;

6. In the case you are working with a colored frame, tap on Effects -> B&W. This will turn your final image to B&W and will also merge both layers. Save to Album.

7. If after merging the photo with the frame you want to further adjust contrast and brightness, you can go back to Film Lab and repeat step 3 till you like the final result.

That’s it! Pretty easy, uh?